 Burr and Burton Academy
Student Portfolio:
Jonathan Saunders
Burr and Burton Academy
Student Portfolio:
Jonathan Saunders
Unit 8
Reverbs and Delays in Logic Pro X
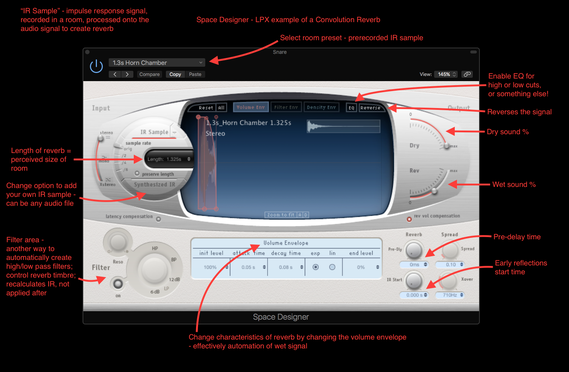
Space Designer: (convolution reverb)
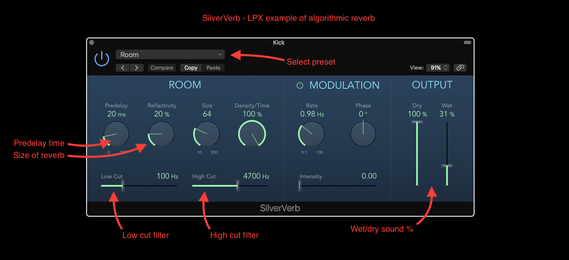
SilverVerb: (algorithmic reverb)
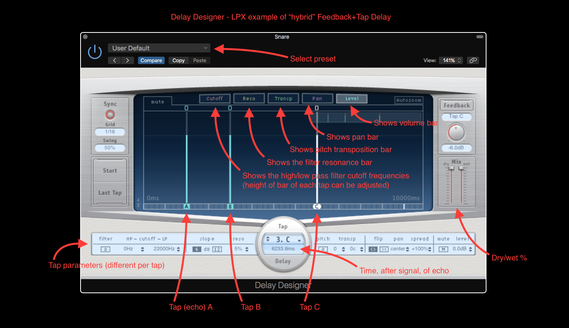
Delay Designer: (delay)
https://imgur.com/a/CoTHp - full size images
Reverb and Delay Practice
Synchronicity, again - no effects on vocals
Synchronicity, again - reverb effect on vocals (Space Designer)
Synchronicity, again - delay effect on vocals (Delay Designer)
In this one-class-period mini-project, I tried to use all the functions of the Space Designer and Delay Designer effects in LPX in a practical effect on the vocals of "Synchronicity II" by The Police. This was done on a clean copy of the original "Synchronicity", not the version I've been mixing for the past four units; the audio effects were placed on the vocals only, and all other tracks had their volume reduced to make room for and pronounce the vocals. Originally, I wanted to try to create a similar sound with the Space Designer as with the Delay Designer, but I didn't try too hard after I figured out how much different they are.
Overall, I greatly prefer using the Space Designer to the Delay Designer, and I think it will be more useful in my future mixes, just as it was on this one. The Delay Designer can create echoes, and it can control the aspects of those echoes, but I've found it to be more limiting in what it can do on its wet signal; unlike reverb, there is no calculated space, the wet signal is by default an exact copy of the dry signal, just replayed on a delay, so my ability to edit and perfect the wet sound's ability to bounce is just not there. The Space Designer, meanwhile, is a very smart convolution reverb; it can take the aspects of a real room and combine them on top of Sting's vocals, creating a much more interesting, dynamic, and customizable wet signal. I also feel that with the Space Designer, the final sound is much less like an original plus an echo, but rather one seamless, almost harmonical, result.
I'm also very happy I can finally understand all the aspects of the Space Designer and control them intelligently... I've been using that plugin throughout this class and in Electronic Music, but I never knew what it meant, just that it made a cool sound. Now, with my new knowledge I can take the Space Designer to the next level by controlling every time setting (pre-delay, early reflections, reverb time) and wet sound setting (%, room characteristics, low/high cut filtering, diffusion).
Important Things To Remember
Components of reverb:
- Pre-delay - the time between when the original sound starts and when the early reflections are heard
- Early reflections - the first "bounced" sounds heard
- Reverb time - the time it takes for all the reverb to dissipate
Additional reverb controls:
- Wet sound % - amount of reverb being applied to a sound
- Dry sound % - amount of initial sound before reverb effects
- Room size - proportional to the length of decay time
- Low cut - does not apply reverb to lower frequencies
- High cut - does not apply reverb to higher frequencies
- Diffusion - distortion of the echo
Types of reverbs:
- Hall reverb - large, complicated spaces, natural
- Room reverb - a regular room, smaller, simpler spaces. natural
- Plate reverb - less distance and depth, small, clean and bright
- Spring reverb - bouncy, unnatural sound, "vintage depth and dimension"
- Algorithmic reverb - computer simulated reverb: PlatinumVerb, GoldVerb, EnVerb in LPX
- Convolution reverb - use prerecorded samples of sound in spaces for combination with sounds in a track to produce the reverb; more processor intensive: Space Designer in LPX
- Modeling reverb - like a convolution reverb, but instead of emulated spaces, emulates vintage or analog reverb technology
The process of selecting, setting up, and tweaking a reverb plugin:
- Choose the reverb type and configure it in your DAW
- Select a preset to start with, but don't be afraid to modify it
- Set the early reflections
- Set the predelay and early reflections
- Set reverb decay time
- Set the size
- Set density and diffusion
- Stereo width adjustment
- Set damping and insert an EQ
Delay:
- 'Delay' is very similar to reverb, but is essentially simpler, dealing with delayed versions (echoes) of the same signal, not changing the signal too much as it bounces
- Type 1 - Feedback delay - more feedback, more echoes with signal; can easily create excess noise in a mix, though
- Type 2 - Tap delay - specific times and attributes of echoes ("taps") can be configured
The process of mastering audio:
- Prepare the master mixes - bounce the file
- Transfer - send the file to the mixing service
- Set the song order
- Edit - so each song flows into the next
- Set the space between songs
- Processing - minor compression and EQ, where necessary
- Levels PQ and ID coding - normalize audio levels to make songs even, add necessary information into the audio file for identification, copy protection, ownership claims
- Dithering (for physical media) - add random noise when bitrate needs to be lowered for CDs
- Create the final production master (for physical media) - create a high-quality specialized file (.pmcd or .ddp format) to send to the manufacturing plant so they can press the CDs